
Checkwriters must configure and turn on the payroll import function for your company. To initiate the setup, contact our Client Support Team at support@checkwriters.com. We will work with you to ensure your import is mapped correctly.
Navigate to Imports
Import Process
Warnings and Errors in Payroll Import
Payroll Import Setup
- Requirements
- Example Import
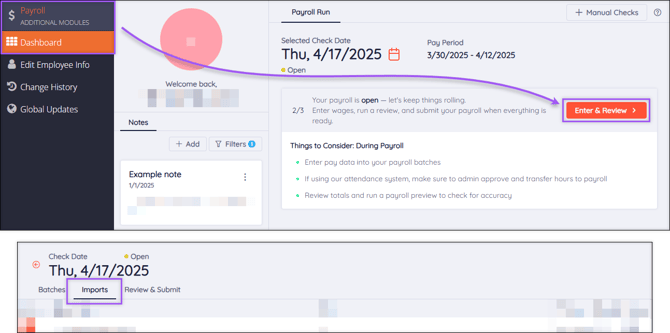
Navigate to Imports
To access the Batches tab, navigate to Payroll (module) → Dashboard → Get Started/Enter & Review → Import (tab).
Import Process
To start a Payroll Import, upload your import file into Checkwriters. Jump to the Payroll Import Setup section of this article for details on how to set up your import file.

This will remove data from this import and any other imports mapped to the batch. It will also delete any related manual entries, time off records, and time transferred from Time Management.
- Select Upload
 beside the desired Import Name. An import upload pop-up will appear.
 - Select Choose to pick a file to upload. Accepted file types are .csv and .txt. Jump to the Payroll Import Setup section of this article for details on how to set up your import file.
- After choosing a file, select Import.
- If there are no issues with the import, the status will show as “Success”. If the import was unsuccessful, the status will show as “Error” or “Warning”.
- Select History
 to view the history of an import.
 - Select Delete
 to delete the import.
CAUTION: Deleting an import will remove data from all imports associated with the batch. It will also delete any related manual entries, time off records, and time transferred from Time Management.
Warnings and Errors in Payroll Import
After completing a Payroll Import, you may see a Warning or Error status. If this happens, select Detail ![]() to show more information about the import.
to show more information about the import.

- Warning and Error messages will identify which line and column in the file need to be reviewed.
- If you don’t remove the heading line from your CSV file, you will receive a warning message stating “Line 1, Employee [ID]: Bad employee number.”
- If this is the ONLY warning and error message associated with the batch, you do not need to correct anything within the file. The system will proceed to the second line and run normally.
- Verify your import totals by running a Preprocess Register report and cross-checking your import information.
- For all other warnings and errors, you must delete the import, fix the file, and re-import the file.
Best Practice: You should ALWAYS verify your totals after an import. The best way to do this is by running a Preprocess Register report.
Learn more about the Preprocess Register.
Payroll Import Setup
Basic imports are configured so each column correlates to a different payroll-related item. These imports should be CSV files when they are imported into the Checkwriters software. Below is a typical import setup, but we can customize your company’s import configuration to best suit your needs.

- Column A, ID: The employee’s ID number.
- Column B, DET: Determines if the line of data is a Deduction, Earning, or Tax.
- Column C, DET Code: The code that the line of data will be imported under (e.g. 2Reg, OT, Bonus).
- Column D, Hours: The appropriate number of hours for the line of data.
- Column E, Rate: The hourly pay rate for the line of data. If hours are entered and the Rate column is left blank, the hours will calculate at the employee’s Base Rate (find your employee’s Base Rate by navigating to Employee Center → Select employee → Payroll tab → Rate tab).
- Column F, Amount: The flat amount that will be paid for this line of data. If data is entered in the Amount column, the Hours and Rate columns can be left blank.
Requirements
To avoid common import errors, please adhere to the following:
- If an employee needs to be paid out under multiple earning codes, you must create a separate line for each earning code. Each line will be applied to the same check.
- Your exported CSV file should not include column headers (ID, DET, etc.). If you use the headers while entering information, delete the header row before exporting the file.
- Figures cannot contain commas. For example, use “1000” instead of “1,000” when entering data.
- Every DET Code entered must match a code set up for your company.
- Your import file name must be under 15 characters.
Example Import
Here’s an example of how a filled-in import might look:

In this example, we’re paying out three employees the following:
- Employee #1: 40 Regular hours at their Base Rate
- Employee #2: 40 Regular hours at their Base Rate, 5 Overtime hours at their Base Rate.
- Employee #3: 32 Regular hours at their Base Rate, 8 Vacation hours at $20/hour, and a $500 Bonus.
Tip: Don't forget to delete that header row before exporting as a CSV file!