
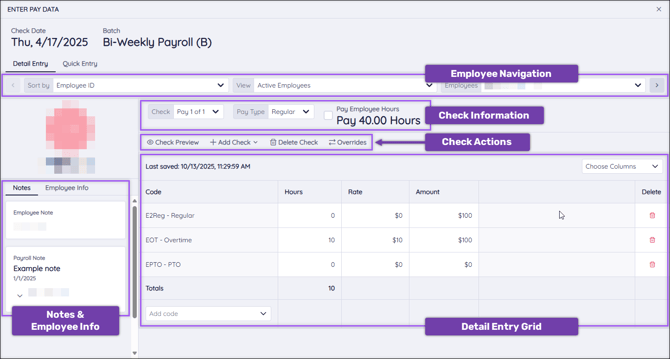
Navigate to Detail Entry
Layout
- Employee Sort
- Check Information
- Check Actions
- Detail Entry Grid
- Notes & Employee Info
Detail Entry Process
- Autopay Employees
- Enter Pay Details
- Add Additional Deductions, Earnings, and Taxes
Navigate to Detail Entry
Find the Detail Entry page by navigating to Payroll (module) → Dashboard → Get Started/Enter & Review → Batches (tab) → Enter Pay Data (select batch)→ Detail Entry (tab).
Layout
All changes made in Detail Entry are saved automatically.
Employee Sort
The employee sort bar allows you to navigate between employees within the selected batch.
![]()
- Navigation arrows: Use the arrows to toggle between employees within the batch.
- Employee filters: Use the Sort By, View, and Employees drop-down menus to navigate to a specific employee within the batch.
Check Information

- Check: Some employees may have multiple checks associated with the selected batch. Use this drop-down menu to navigate to a different check.
- Pay Type: Choose which paycheck attribute this check should use. Pay Type could be Regular, Bonus, Third-Party, Commission, Manual, Nocalc, or Reversal.
- Autopay checkbox: If autopay is enabled for an employee, this box will automatically be checked. This will show a base salary or number of hours.
Check Actions
![]()
- Check Preview: Preview the check. This will include a breakdown of all earnings, deductions, and taxes associated with the check.
- Add Check: Add a standard, net-to-gross, or third-party check to an employee’s payroll.
- Standard: Add an additional standard check for the employee during the Selected Check Date.
- Net-to-Gross: This is used to gross up checks with a desired net amount. The Net-to-Gross check will determine the total pay (gross) that should be paid, ensuring your employee receives an exact amount (net) after deductions. Adding a net-to-gross check here creates a live check within Checkwriters. This is separate from a net-to-gross Manual Check.
- Take Home (Net) Pay: Enter the net dollar amount you want your employee to receive.
- Check Number: Enter the appropriate check number or the date you entered the check’s information. This is for your record, so you may choose whichever method works best for you. Check numbers must be 10 characters or less.
- Tax Frequency: Taxes are calculated on the employee’s Base Pay frequency (e.g., if they are paid biweekly, the default tax frequency is biweekly). You may override the tax frequency within the Manual Check to calculate income withholding. If this field is left blank, it will default to the employee’s Base Pay frequency.
-
-
- Override FITW %: If this is left at 0.00, the standard Federal Income Tax Withholding will be applied.
- Override SITW %: If this is left at 0.00, the standard State Income Tax Withholding will be applied.
- Block Automatic Payments: Select this checkbox to turn off Auto Pays and Fringes assigned to an employee’s profile. These payments can be reviewed on an employee’s Auto Pay or Fringe tabs in the Employee Center.
- Block Deductions: Select this checkbox to turn off automatic deductions assigned to an employee’s profile. These deductions can be reviewed on an employee’s Deduction tab in the Employee Center.
- Use Supplemental Tax Rate: Select this checkbox to apply the State and Federal supplemental tax rates.
- Taxes
- Code: Add a tax code to the entry grid using the Add Code drop-down menu
- Hours: Enter how many hours an employee has recorded for each additional tax code.
- Rate: If the employee should be taxed at a different rate for the selected tax code, enter a new rate of pay.
- Amount: The dollar amount that should be withheld for that tax. Information entered here will override information in the Hours and Rate columns.
- Add Code dropdown: Use the drop-down menu to add tax codes to the grid.
- Choose Columns: Select additional informational columns to display on the grid.
-
-
-
- Check Preview: Preview the check. This will include a breakdown of all earnings, deductions, and taxes associated with the check.
- Third Party: Third Party Checks are used to document payments, such as Short Term Disability (STD), Long Term Disability (LTD), and any private plans employers may have for states with Paid Family and Medical Leave (PFML). Due to the complexity of Third Party pays, these should be set up with the help of a Checkwriters Client Support Specialist. Please contact Client Support at support@checkwriters.com for assistance.
-
- Delete Check: Delete the check.
- Overrides: Create a specialized check override. Learn more about Check Overrides.
Detail Entry Grid
Enter Hours, override a Rate, or pay a dollar Amount for any earnings, deductions, or taxes for the selected employee.
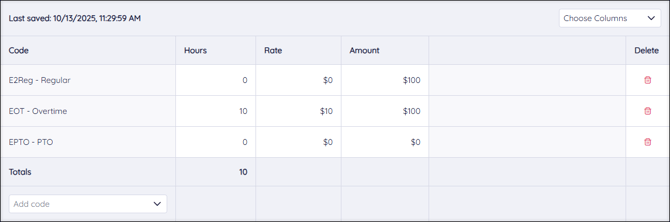
- Columns: The columns listed on your detail grid will vary based on your company’s setup. Codes, Hours, Rate, Amount, and Delete will always be shown.
- Code: This column shows a list of earning codes that are automatically displayed each payroll.
- Use the Add Code drop-down menu to add a new code to the grid.
- “D” codes are Deduction Codes, “E” codes are Earning Codes, and “T” codes are Tax Codes.
- Hours: Enter how many hours an employee has recorded for each specific earning code.
- Rate: If the employee should be paid a different rate than their current base rate, enter the new rate of pay.
- Amount: The dollar amount that should be paid for the specific earning code. Information entered in this field will override information in the Hours and Rate column.
- Delete: Delete an earning code from the check by selecting delete
 .
.
- Code: This column shows a list of earning codes that are automatically displayed each payroll.
- Choose Columns: Use the drop-down menu to select which columns are displayed in the grid.
- Add Code: Use the drop-down menu to add additional deduction, earning, and tax codes to the grid.
Note: If you add an additional tax code to the grid, the Amount entered will be the exact amount deducted for that tax line.
IMPORTANT: Social Security (OASDI) and Medicare taxes should not be added to the grid, as these taxes must be calculated for all applicable employees based on the IRS rates. If these taxes are included in the Detail Entry grid, your payroll will need to be corrected later.
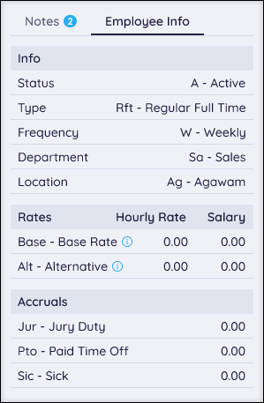
Notes & Employee Info
Notes
This column displays all notes associated with the selected employee. This section sources notes from Employee Center: Employee Note to display individual employee notes and Payroll Notes to display notes that apply to the entire check date. Toggle between Notes and Employee Info using the tabs.

Employee Info
This column displays important information about your employee, including their rates and accruals. Toggle between Notes and Employee Info using the tabs.
Detail Entry Process
Take a look at some of the scenarios you may encounter while using the detail entry grid.
Autopay Employees
Salaried and Hourly employees can both be paid using the Autopay function.
- The Autopay checkbox will automatically be checked if “Pay base salary each paycheck” or “Pay default hours each paycheck” is selected on the employee’s Rate page.
- Add or edit an employee’s salary or hourly rate by navigating to Employee Center → Select Employee → Payroll tab → Rate tab. Learn more about Employee Center: Rate.

More Info: Learn about the Reduce Auto Pay function.
Enter Pay Details
You can also enter pay details into the Detail Entry Grid to pay your employees.
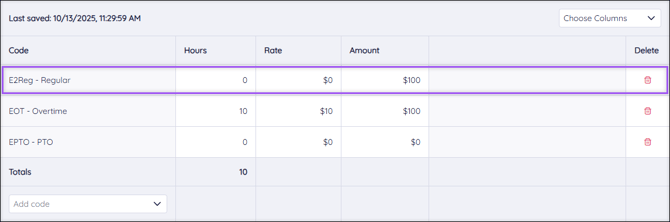
Let's take a look at how to enter pay information into this Regular code highlighted above as an example.
- Enter the number of regular hours your employee worked in the Hours column. By default, this will calculate at your employee’s Base Rate (shown in the Rate Code column).
- You can override the Rate Code column by entering a rate into the Rate column. This will then calculate the number of hours at the Rate column rate.
- You can override the Hours column by entering a flat amount into the Amount column.
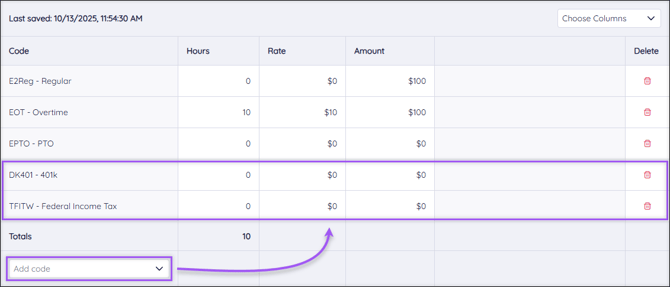
Add Additional Deductions, Earnings, and Taxes
Add additional deductions, earnings, and taxes using the various codes in the Codes column.
- Add a new code to the grid by selecting Add Code and selecting the desired code.
- “D” codes are Deduction Codes, “E” codes are Earning Codes, and “T” codes are Tax Codes.
- Each kind of code calculates as explained in the above Enter Pay Details section.
Note: If you add an additional tax code to the grid, the Amount entered will be the exact amount deducted for that tax line.
IMPORTANT: Social Security (OASDI) and Medicare taxes should not be added to the grid, as these taxes must be calculated for all applicable employees based on the IRS rates. If these taxes are included in the Detail Entry grid, your payroll will need to be corrected later.