
Add a New Hire
New Hire Center
Activate the New Hire
Add a New Hire
To start a New Hire, navigate to HR Admin (module) → Hire Employees → Add New Employee. Below are important reminders to consider as you enter your New Hire.

- The Employee ID will automatically generate as the next available ID number.
- The Hire Date will default to today’s date. You may change this date as needed.
- Fields marked by a red asterisk are required.
-
- The Social Security Number (SSN) fields are not marked with an asterisk but are required. The SSN must be entered twice to confirm its accuracy.
- The email fields are not marked with an asterisk but are required. It’s important to add the employee’s email address so they can be sent an Employee Self Service (ESS) enrollment.

- The Cost Center fields are required for all employees. The first Cost Center will serve as the employee’s Home Department. If your company utilizes multiple cost centers (i.e. department, location), all cost center levels must be assigned to the employee.
- Base Rates are assigned as follows, based on whether the employee is salaried or hourly:
- Salaried employee: Enter the amount per payroll that the employee should be paid in the Salary field.
- In the Auto Pay field, you must select “Pay Base Salary Each Paycheck” in order for your employee to be automatically paid each payroll.
- You can also enter the default number of hours the employee will be working during each pay period in the Default field to keep that information as a memo.
- Salaried employee: Enter the amount per payroll that the employee should be paid in the Salary field.
- Hourly employee: Enter the employee’s hourly rate in the Rate field.
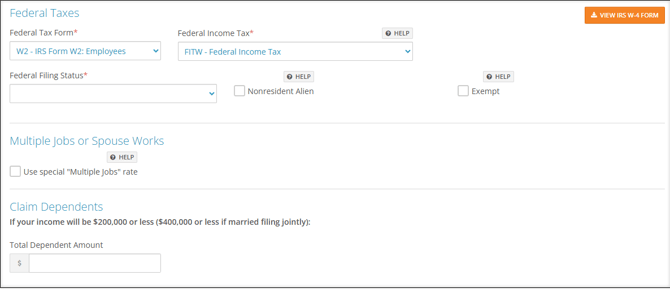
- Select the Federal and State Filing Statuses in the appropriate fields and fill out the Dependents, Exemptions, and Other Adjustments fields.
- If you have employees in multiple states, you will need to select the applicable state for this specific employee.
- If the employee has an additional amount to withhold for state taxes, that will get added later.

Once you have filled out all of the New Hire fields as necessary, select Continue. This will save the employee in the HR Admin (module) → Hire Employees → New Hire Center, where you will automatically be brought.
New Hire Center
Now in the Information tab of the New Hire Center, click through each of the tabs to enter more employee details.

- Demographics: Manage employee demographic data including address, birth date, and contact information.
- Custom: Store additional optional information about your employee that is not recorded elsewhere in the system.
- Retirement: Store information for Retirement Reporting purposes. This is for informational use only and will not affect an employee’s retirement withholding or the Employer Match/Safe Harbor calculation.
- Benefit: Reserved for clients using an integrated Benefits Admin system.
- Profile: Upload an employee’s profile picture and enter biographical information. This information will show in the employee’s ESS profile. If your company utilizes Onboarding, this information will be used as the leadership profile for company leaders that have been assigned to a specific employee or onboarding template.
- Status: Manage employment data such as employee statuses, employment dates, and other miscellaneous information. This would also be where you select a Pay Policy if your company utilizes HR Admin (module) → Time Off Center → Time Off Calendar.
- Departments: Manage an employee’s Home Department and Cost Center information. Update position information, Workers Comp classification codes, and title information
After you’ve confirmed your employee’s personal information, select the Payroll tab to start filling out their pay information.

- Accrual: Select Add New to assign accrual codes to the employee. Please remember to assign every applicable code (Sick, Vacation, Personal, etc.).
- Auto Pay: Enter additional earnings, separate from regular pay, to be automatically added to an employee’s paycheck. Includes items such as car allowance, stipends, etc. When using this feature, the employee will be paid regardless of whether they are salaried or hourly.
- Deduction: Select Add New to create any additional deductions that may be needed (i.e. Medical, Dental, retirement).
- If you choose to add a 401(k) deduction as a percentage contribution, select “%EARN - % of 401(k) Eligible Earnings” in the Calc Code field. This will take a percentage of only the eligible earnings for the retirement plan.
- Direct Deposit: Select Add New to create a new direct deposit for your employee.
- If the entire net pay should be in one check, select “Percentage of Net Pay” in the Amount Code field. Enter “100%” in the Amount field and “99” in the Priority (1-99) field.
- If you wish to override the prenote date and have the direct deposit transferred immediately, enter a date at least one month before the prenote date in the Prenote Date field.
- Employee Note: Document employee-specific notes that are relevant to payroll.
- Fringe: Manage additional earnings and fringe benefits, automatically included in an employee’s payment. Similar to Auto Pay, if an employee has additional earnings with each check, you can enter the appropriate code here.. The difference with Fringe is that it gets added whenever the employee gets paid. Auto Pay occurs regardless of whether the employee is paid their salary.
- Labor Allocation: Manage employee labor costs across multiple cost centers.
- Pay History: Review employee wages and download employee paystubs
- Rate: Manage employee pay rates and salaries.
- To create an additional rate, select New Additional Rate. You can then enter a rate code and rate amount and indicate which cost center the rate should go to (if necessary).
- Tax: Manage employee tax withholding. To adjust the State and Federal withholding status, select Edit on each code (FITW for Federal, state’s abbreviation for State), then enter the desired amount into the Additional Amount field.
- W2: Download employee W2s from prior years.
Activate the New Hire
Once you have added all the necessary information, navigate to HR Admin → Hire Employees → New Hire Center. Find the employee you’ve just set up and select Activate beside their name. Confirm the activation in the pop-up dialog and the employee will officially be activated.
