
Important: This article describes our Legacy Payroll software. For information on our current software, check out Checkwriters Knowledge Base — Payroll.
PLEASE NOTE! This article only pertains to companies who are able to print checks directly in Checkwriters. If you do not have this feature turned on, please refer to our regular manual check guide here.
Manual Checks
Navigate to Payroll Entry > Manual Check. This screen will resemble the Detail Entry Grid in the regular Payroll. The below screenshot will cover the different areas you will use when posting a manual check:
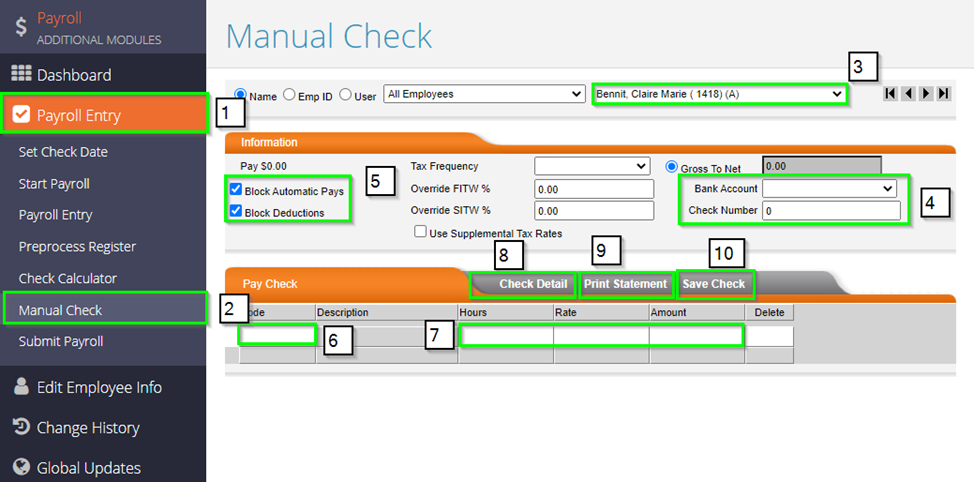
- Payroll Entry – you will select this to bring down the menu to select the Manual Check screen.
- Manual Check – selecting this will bring this to you the manual check screen.
- Employee Select – this is where you will select the employee for whom you need to post the check.
- Bank Account and Check Number – the Bank Account will always be ‘Client’. The Check Number will be either the number of the check you cut to the employee, or you can use the date you enter in the check.
- Block Automatic Pays and Block Deductions – this can be used to block auto pays or fringes (Automatic Pays), or deductions on an employee’s profile.
- Code – you will pull in either the deduction, earning, or tax code you need to apply to the check Deduction codes start with D, Earnings start with E, Taxes start with T.
- Hours/Rate/Amount – just like the payroll entry screen, each column is what you will be paying out the employee before – hours, an hourly rate, or an amount. If the employee is hourly, then any hours will multiply against their base rate.
- Check Detail – enables you to get a preview of the check.
- Print Statement – both saves the check in the next payroll and generates a paystub for you to download, print, and give to the employee.
- Save Check – this will just save the check in the next No paystub will be generated until the payroll processes.
Most of these fields need to have information entered in them. In some circumstances where an employee has multiple deductions set up but you only want to withhold one, you would need to manually pull it in in the Code area and then type in the desired amount in the amount column.
Block Deductions should still be checked off. When a manual check is posted, a second batch will be generated in your next payroll, labeled Batch VM (for Voids/Manuals).
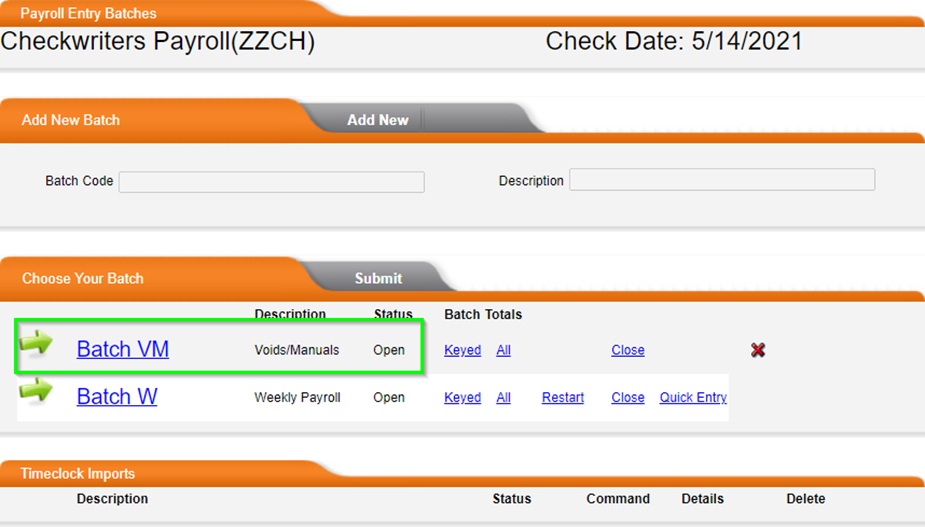
These checks will NOT actually generate a payment to the employee. These will reflect checks processed outside of payroll. As such, Checkwriters will not be debiting you for the net amounts for the check. We debit for the tax portion alongside your regular payroll. Once the payroll processes, these manual check figures will be added to the employee’s YTD wage info.
Check Calculator
Check Calculator is a useful tool for grossing up checks with a desired net amount. This, too, will be located under Payroll Entry. After selecting Check Calculator, you again will be brought to a screen that slightly resembles the payroll entry screen, although this will more closely resemble the Manual Check screen.
While the overall process is similar to posting manual checks, the main difference is that we will be entering in the net amount to calculate a grossed-up version of the payment. The below screenshot will go over the different areas on this screen:
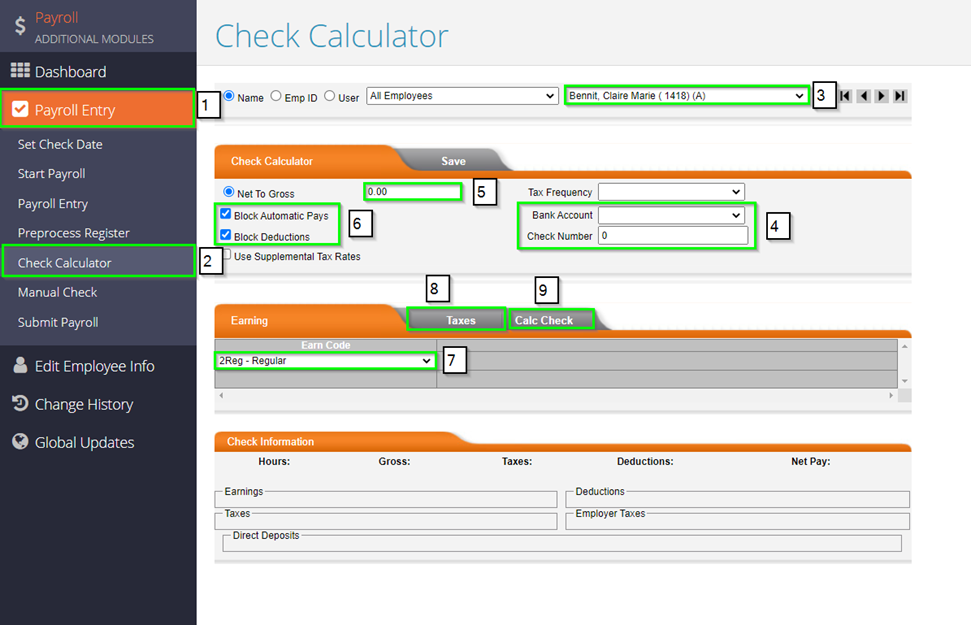
- Payroll Entry – you will select this to bring down the menu to select Check Calculator.
- Check Calculator – selecting this will bring you to the Check Calculator screen.
- Employee Select – this is where you will select the employee for whom you need to calculate a check.
- Bank Account and Check Number – the Bank Account will always be ‘Client’. The Check Number will either be the number of the check you are cutting to the employee, or you can use the date you enter in the check.
- Net to Gross – this is where you will enter in the desired net pay.
- Block Automatic Pays and Block Deductions - this can be used to block auto pays or fringes (Automatic Pays), or deductions on an employee’s profile.
- Earn Code – you can pull in one of your various earning codes here to pay out the employee under.
- Taxes – if you would like to pull in an income tax to either block taxes, or put in a desired tax amount, you can use this tab (will be covered in another screenshot).
- Calc Check – this will calculate the check and give you a preview on the same screen.
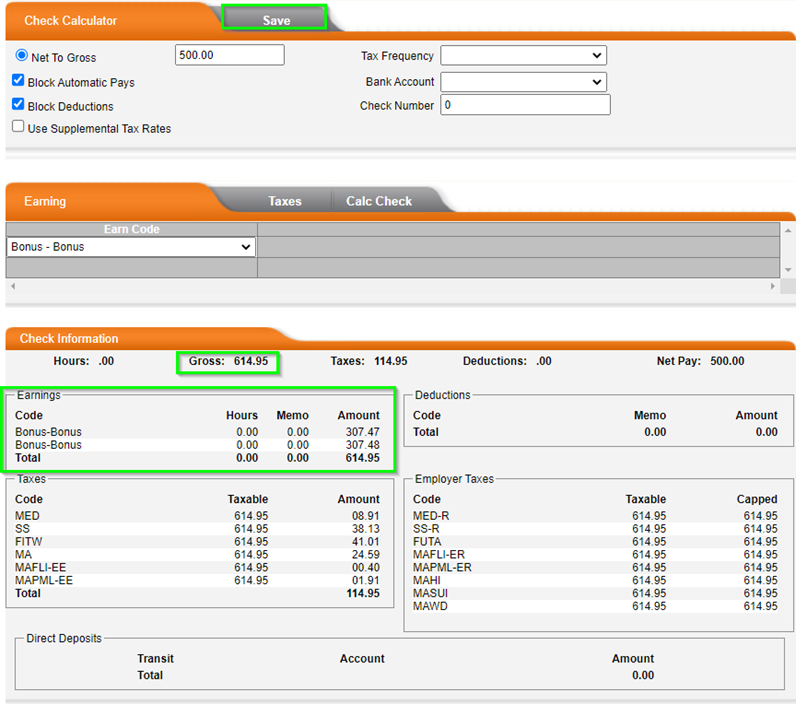
After selecting Calc Check, this will give you a preview of the check. We can see the grossed-up amount below. If this check looked correct, we would be able to save the check by selecting Save. Just like the Manual Check, this will save the calculated check in the next payroll, in a batch labeled VM.
Unlike Manual Check, you cannot generate a pay stub for Check Calculator until the payroll processes. Therefore, if desired, you can get the gross up amount, then navigate back to Manual Check and post the check with the grossed-up figure. You will be able to generate a Paystub if you utilize Print Statement.
The Taxes option can be used to change the tax amount being withheld from the check. After selecting Taxes, you will see that the screen has changed and you can now pull in an Income Tax code in the Tax Code box.
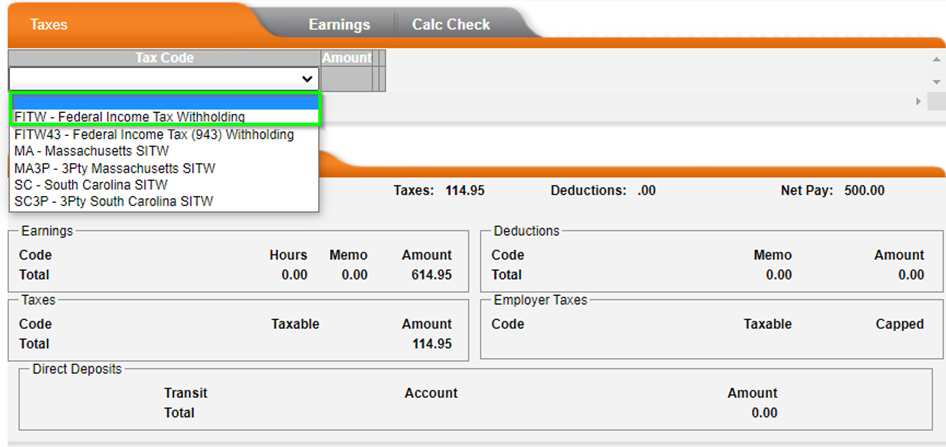
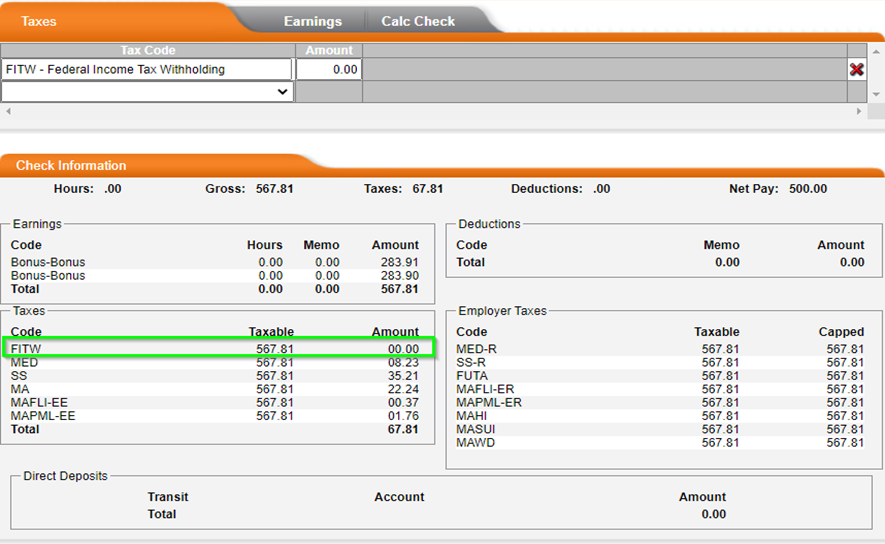
After selecting the proper code, hit ENTER to pull in an Amount column. If left as 0, this will ‘block’ the tax so it is not withheld. If an amount is entered, that is the amount that will be withheld/calculated in the gross up.
These checks will NOT actually generate a payment to the employee. These will reflect checks processed outside of payroll. As such, Checkwriters will not be debiting you for the net amounts for the check. We debit for the tax portion alongside your regular payroll.
Once the payroll processes, these manual check figures will be added to the employee’s YTD wage info. In either example, Manual Check or Check Calculator, the check does not need to be saved or posted. Both can be used to just calculate checks.
Printing Checks – PRINT BACK ONLY
If you print checks checks directly in Checkwriters, you are also able to print manual checks that you post. There will be additional options: Check Date and Print Check. Check Date will default to the day you are entering in the check, which is the date that the employee will be able to cash the check. You can change it to any date that is needed.
Print Check is used once you follow the above instructions and are ready to print the check.

Once this is selected, you will be brought to a screen that has a Download link. Selecting this will download a PDF of the check that can be printed. THE CHECK MUST BE DOWNLOADED AND PRINTED AT THIS TIME. If this step is not completed, then a check will not be printed until after the regular payroll is processed. If there are any mistakes with the check or if you need it deleted, please contact our Client Support Team at support@checkwriters.com so it can be removed.