
Layout
Add or Edit a Rate
Navigate to Rate
Find the Rate page by navigating to HR Admin → Manage Employees → Employee Center → select ![]() Employee → Payroll (tab) → Rate (tab).
Employee → Payroll (tab) → Rate (tab).
Switch between viewing the employee’s Base or Additional Rates using the drop-down menu.

Layout
The Rate tab lists all rates assigned to the employee and additional relevant details:
- Select New Base Rate to create a new Base Rate.
- Select New Additional Rate to create a new Additional Rate.
- Select Grid Options to add additional columns to the Rate grid.
- Select Export to export all data shown in the Rate grid.
- Select Edit
 to edit an existing Rate.
 - Select Delete
 to delete an existing Rate.
Add or Edit a Rate
To create a new Base Rate, select New Base Rate. You can also create a new Additional Rate by selecting New Additional Rate. When you add a new rate, the previous rate will automatically end-date to the day before the new rate’s Start Date.
Take a look at each of the fields available when adding a new Base Rate or editing an existing one. Additional Rates have fewer field options.
Best Practice: You can also create a new rate by copying an existing rate:
-
Select copy
 beside the employee’s existing rate. This will copy the existing rate’s Department, Location, Default, and Auto Pay selections to a new Base Rate. After you save the new rate, the previous one will automatically be end-dated to the date before the new rate’s Start Date.
This works with both Base Rates and Additional Rates.
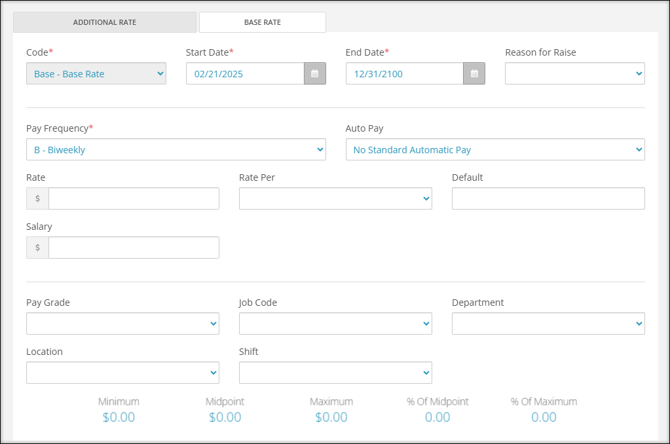
- Code: Select the appropriate Rate Code. A primary rate of pay is classified as a Base Rate. An employee may have additional rates, which would be classified separately from the Base Rate.
- Start Date: Enter the first check date for this rate to be active.
- End Date: Enter the last date this rate should be applied. If you want this rate to occur indefinitely, enter “12/31/2100”.
Important: All active employees must have an active Base Rate for payroll to successfully process. We recommend setting the Base Rate end date to 12/31/2100 to avoid payroll processing issues due to an inactive Base Rate.
- Reason for Raise: If you have added reason codes in the Company module, you can select those codes here to explain why a raise was entered.
- Pay Frequency: Select the frequency at which the employee will be paid. This is also the tax frequency for the employee’s earnings.
- Auto Pay: Select whether the employee will have automatic payments.
- No Standard Automatic Pay: This is typically used for hourly employees. When this is selected, the employee’s pay will be based on any hours manually entered in Payroll.
- Pay default hours each paycheck: When selected, the employee will automatically be paid the Rate per hour for the Default Hours set in the subsequent fields.
- Pay default salary each paycheck: This is typically used for salaried employees. When this is selected, the employee will automatically be paid their Salary, set in the subsequent Salary field.
Best Practice: If a salaried employee is not being paid, the Auto Pay setting may not be configured correctly. Learn more about this and the Reduce Auto Pay function.
- Rate: If paying the employee hourly, enter their hourly rate. Any value entered in this field will be multiplied by the hours entered in Payroll to calculate the employee's payment.
Note: If an employee must be paid at different rates for different jobs within the same pay period, additional earning codes can be added to the employee’s check during the Payroll Entry process.
- Rate Per: Select a rate classification. This is an optional field that does not affect the employee’s pay – it is for reporting purposes only.
- Default: Enter the default number of hours the employee works each payroll. This field is typically used for, but not exclusive to, salaried employees so that you can memo their hours each payroll.
- Salary: Enter the flat amount to be paid out each payroll. If an employee’s Auto Pay field is set to “Pay default salary each paycheck”, they will receive the amount entered in this Salary field.
- Pay Grade: If you utilize pay grade codes in the Company module, you can select those codes here to signify the pay grade for this rate. This will update the minimum, midpoint, maximum, % of midpoint, and % of maximum values that populate at the bottom of the Rate page.
- Job Code: If you utilize job codes, you can select a code in this field, attributing the employee’s pay to that specific code.
- Department: This is the employee’s CC1 (cost center). This is typically left blank unless you wish to link rates to cost centers.
- Location: This is the employee’s CC2 (cost center). This is typically left blank unless you wish to link rates to cost centers.
- Shift: If you utilize shift codes, you can assign this rate to a specific shift code that can alter an employee’s pay or just be tracked for reporting purposes.
FAQs
What if I need to pay an employee for different jobs, paid at different rates, within the same pay period?
Various rate codes can be selected during the Payroll Entry process. To remedy this situation, you can add an additional earning code to the employee’s check.