
Navigate to Direct Deposit
Layout
Add or Edit a Direct Deposit
- Amount Codes Explained
- Priority Explained
Examples
More Info: Learn more about Direct Deposits with our Guide: Direct Deposit for Administrators.
Navigate to Direct Deposit
Find the Direct Deposit page by navigating to HR Admin (module) → Manage Employees → Employee Center → select ![]() Employee → Payroll (tab) → Direct Deposit (tab).
Employee → Payroll (tab) → Direct Deposit (tab).

Layout
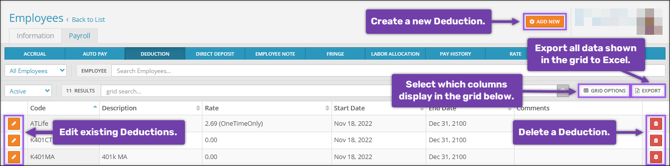
The Direct Deposit tab lists all direct deposits assigned to the employee and additional relevant details:
- Select Add New to create a new Direct Deposit.
- Select Grid Options to add additional columns to the Direct Deposit grid.
- Select Export to export all data shown in the Direct Deposit grid.
- Select Edit
 to edit an existing Direct Deposit.
 - Select Delete
 to delete an existing Direct Deposit.
Add or Edit a Direct Deposit
When you select Add New to create a new direct deposit or Edit to edit an existing direct deposit, the Direct Deposit Editing aside will appear with setup fields:

Best Practice: Only edit a direct deposit if you want to change the Amount Code, Amount, or Priority. If you wish to change the bank account (Routing Number or Account Number) we suggest you end date the direct deposit for the day before the next check date and create a new direct deposit with the new bank information.
- Account Type: Indicates if the direct deposit will go into a Checking or Savings account.
- Routing Number: The bank's ABA routing number. This will always be 9 digits. After entering this number, the bank name should generate at the top of the Direct Deposit screen. If you see “Bank not on file”, please confirm the account details with your employee. If their account details are confirmed, please contact our Client Support Team at Support@checkwriters.com to add the bank.
- Account Number: Your employee’s account number, associated with the bank routing number. This is usually 8 to 12 digits long.
- Name on Account: Employee's name as it appears on the bank account. If not entered, it will default to the employee's name in the system, once saved.
Best Practice: Verify an employee’s account information with a voided check.
- Amount Code: Use the drop-down menu to select which amount code will be associated with the direct deposit. Unsure of which amount code to use? Check out Amount Codes Explained.
- Amount: Enter the Flat Amount number or Percentage of pay that will be deposited into your employee’s bank account.
- If you choose a Flat Amount in the Amount Code field, you will be prompted to enter a Flat Amount number.
- If you choose a Percentage in the Amount Code field, you will be prompted to enter a Percentage of pay.
- Priority (1-99): This field determines the order in which the direct deposits will be processed. “1” is the top priority, and “99” is the last priority. Check out our examples to better understand how to set up priorities.
- Start Date: This is the date your employee’s direct deposit will begin. This will default to the next available unprocessed check date.
- End Date: This is the last date your employee’s direct deposit will be applied. For a direct deposit to occur indefinitely, enter 12/31/2100.
- Prenote Date: Set a 14-day period during which the bank will validate the accuracy of the direct deposit information. The employee will receive a physical check until this process is complete.
- For companies using the prenote period: The system automatically populates this field with the next check date. You can change the system’s processing logic, indicating that the prenote has already taken place, by entering a passed date in this field. If you do, enter a date that is at least one month before the check date.
- For paperless companies: We are working toward going paperless with all our clients. Because of this, Prenote will most likely be overridden by default. We suggest verifying an employee’s account information with a voided check.
- Exclude Special Checks: This checkbox indicates whether the direct deposit should occur on check types with the Special Payment Flag selected. Special Payment Flags can be used to override tax calculations.
- If you check the Exclude Special Checks box on a direct deposit with a Special Payment Flag, special checks will not be deposited into this account.
- Special Checks can be used to tax checks at the supplemental tax rate, automatically block specific direct deposits, block certain deductions, and override specific taxes. Special checks can be set up in Company → Company Setup → Paycheck Attributes.
Amount Codes Explained

Flat Amount or Remaining Net Pay
- This code is used to deposit a flat amount into an account.
- If the flat amount is less than the net pay, the system will deposit the flat amount and the remaining pay will move to the next priority account.
Example: My flat amount is $30 and my net pay is $40. Using this code, the $30 flat amount will be deposited and $10 will move to the next priority account.
Note: The Amount entered should never be $0 if using this code.
Flat Amount or Zero
- This code is used to deposit a flat amount into an account.
- If the net pay is less than the flat amount, the system will not deposit any money into this direct deposit account. The system will move on to the next priority account.
Example: My flat amount is $30 and my net pay is $20. Using this code, $0 will be deposited into this account.
Example: My flat amount is $30 and my net pay is $40. Using this code, $30 will be deposited into this account and $10 will move to the next priority account.
Note: The Amount entered should never be $0 if using this code.
Percentage of Net Pay
- This code is used to deposit a percentage of the net pay into an account.
Example: My net pay is $40 and I choose to deposit 50% of my net pay using the Amount field. Using this code, $20 will be deposited.
Note: If you want to add an Amount of 100%, the Priority must be set to 99.
Remaining Net Pay less Flat Amount
- This code is used to issue a physical check for a specific amount and deposit the remaining into a direct deposit.
Example: My flat amount is $30 and my net pay is $40. Using this code, I will receive a physical check for $30, and $10 will be deposited into my account.
Priority Explained
The Priority field indicates the order of operations for your direct deposits.
- You can have up to 99 direct deposits.
- Each direct deposit is set up with a priority number.
- The system will deposit money into Priority 1 first, then Priority 2, etc.
Best Practice: We highly suggest setting up a primary account with the Priority set to "99" and the Amount Code “Percentage of Net Pay” set to "100%". This account will catch all remaining pay after higher-priority direct deposits are completed. This will help you avoid getting a physical check for leftover pay.
Examples of Common Direct Deposit Configurations
We’ve compiled some examples of common direct deposit configurations. Check out the scenarios in the left column and follow the steps in the right column to set up direct deposits.
|
Scenario |
Steps to complete |
|---|---|
|
I want all of my pay to go into one account.
|
|
|
I want: 50% of my net pay to go into one checking account. 50% of my net pay to go into another checking account. |
|
|
I want: 45% of my net pay to go into one checking account. 30% of my net pay to go into another checking account. 25% of my net pay to go into a savings account. |
|
|
I want: Only $40 to go into a savings account. The rest of my pay to go into a checking account. |
|
If you need additional assistance, please contact Checkwriters Client Support at Support@checkwriters.com.