
Layout
Add or Edit a Deduction
Deduction Examples
- Child Support Deduction
Navigate to Deduction
Find the Deduction page by navigating to HR Admin → Manage Employees → Employee Center → select ![]() Employee → Payroll (tab) → Deduction (tab).
Employee → Payroll (tab) → Deduction (tab).

Layout
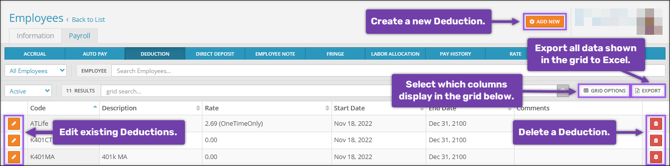
The Deduction tab lists all deductions assigned to the employee and additional relevant details:
- Select Add New to create a new Deduction.
- Select Grid Options to add additional columns to the Deduction grid.
- Select Export to export all data shown in the Deduction grid.
- Select Edit
 to edit an existing Deduction.
 - Select Delete
 to delete an existing Deduction.
Add or Edit a Deduction
When you select Add New to create a new deduction or Edit to edit an existing deduction, the Deduction Editing aside will appear with setup fields:

- Deduction: Select the deduction code you wish to assign the employee.
-
If you select a Deduction that uses a Type of “401k”, “403b”, or “457b” in Company (module) → Company Setup → Deductions, you may need to utilize the Year employee met Roth catch-up threshold field. Learn more about this and the SECURE 2.0 Act Catch-Up Deductions.
-
- Start Date: Enter the first check date for which you want this deduction to be active.
- End Date: Enter the last date for which this deduction will be applied. If you want this deduction to occur indefinitely, enter “12/31/2100”.
- Calc Code: Stands for Calculation Code. This determines how the Rate/Amount is calculated. With it left as “Blank = Flat Amount”, then the amount indicated in the Rate/Amount will be a flat dollar amount.
- Frequency: Select the frequency at which this deduction will be withheld. If it is to be withheld each payroll, then this field can be left blank.
- Agency: When selected, this field generates an Agency Check (a payment to a third party). This field is typically used for child support, garnishments, etc. Agencies must be set up in the Company module.
- Rate/Amount: The amount that should be withheld from this deduction.
- Minimum: The minimum amount that should be withheld for this deduction.
- Maximum: The maximum amount that should be withheld for this deduction.
- Year-to-date Max: The maximum amount that can be withheld in one year for this deduction. Once the maximum is reached, the deduction will stop for the remainder of the year.
- Goal: If a value is entered into this field, the deduction will be withheld each pay period until the goal is met. Once met, the deduction will stop automatically.
- Paid: If a Goal is set, this field will keep track of the amount paid toward the goal thus far. Once the goal is met, the deduction will stop automatically.
- Miscellaneous Info: This field is used to designate the purpose of the deduction. It is strictly for record-keeping purposes and does not impact the employee’s pay.
- Department: This is the employee’s CC1 (cost center). This is typically left blank, which will attribute the deduction to the employee’s home cost center.
- Location: This is the employee’s CC2 (cost center). This field will only appear if you have more than one cost center set up for your employees. Like the CC1, this is typically left blank.
- Job Code: If you utilize job codes, you can attribute this deduction to a specific job code for reporting purposes. This field is typically left blank.
Deduction Examples
Not all fields must be filled in for the deduction to be added. Take a look at some examples of successful deductions.
Child Support

In this example, we’re setting up a Child Support deduction.
- Select the appropriate code in the Deduction field. In this example, we’ve selected “Child - Child Support”.
- Verify the proper Start and End Dates.
- Select one of the following codes in the Calc Code field. This code can be identified on the Child Support Withholding Notice:
- Chld50 - Not in arrears but supports spouse or dependent child.
- Chld55 - In arrears more than 12 weeks & supports spouse or dependent child.
- Chld60 - Not in arrears & NOT supporting spouse or dependent child.
- Chld65 - In arrears more than 12 weeks & NOT supporting spouse or dependent child.
- Set the Maximum deduction amount for the applicable pay frequency as listed on the Child Support Withholding Notice.
- Select the appropriate Agency. If the required agency is not an option in the drop-down menu, please contact Checkwriters Client Support at support@checkwriters.com.
- Enter the Remittance ID found on the Child Support Withholding Notice in the Miscellaneous Info field.
Note: For employees with multiple child support withholdings, special Calc Codes must be set up. Please contact Checkwriters Client Support at support@checkwriters.com.
Flat $50 for Pre-tax Medicare Insurance

In this example, we’re setting up a $50 flat rate deduction for pre-tax medicare insurance”
-
Select the appropriate type in the Deduction field. The designation ‘PT’ indicates that it is a pre-tax deduction.
-
Verify the proper Start and End Dates.
-
Select “Blank = Flat Amount” in the Calc Code field. “Blank = Flat Amount” is the default option, but you should always double-check this field.
-
Enter “50” into the Rate/Amount field. This will withhold $50 each pay period.
5% for 401(k)

In this example, we’re setting up a 5% of eligible earnings deduction for a 401(k) retirement plan:
-
Select the appropriate type in the Deduction field. In this example, we’ve selected “K401 - 401k”.
-
Verify the proper Start and End Dates.
-
Select “%EARN - % of 401(k) Eligible Earnings” in the Calc Code field. When using a percentage for a retirement deduction, always select the “%EARN” code. This will take a percentage of only the eligible earnings for the retirement plan.
-
Enter “5” into the Rate/Amount field. This will withhold 5% of eligible earnings each pay period.
Monthly flat amount for a loan, with a goal

In this example, we’re setting up a monthly flat amount deduction until a goal is met.
-
Select the appropriate type in the Deduction field. In this example, we’ve selected “Loan - Loan”.
-
Verify the proper Start and End Dates.
-
Select “Blank = Flat Amount” in the Calc Code field. “Blank = Flat Amount” is the default option but you should always double-check this field.
-
Select “M - Monthly” in the Frequency field. With this selection, the deduction will be processed just once a month.
-
Enter the desired monthly withholding amount into the Rate/Amount field. In this example, we’ve entered “83.76” to withhold the flat amount of $83.76 each month.
-
Enter the desired goal amount into the Goal field. In this example, we’ve entered “500”. Once the $500 total has been withheld after so many months, the deduction will no longer be applied.
Note: The amount entered into the Rate/Amount field does not need to divide evenly into the amount entered in the Goal field. The deduction will be capped on the final payroll and will withhold only the remaining goal balance.