This article will cover inputting rate changes on an employee's profile.
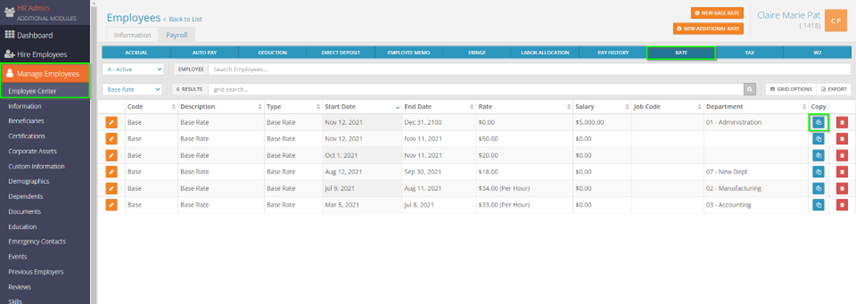
Select the employee you would like to edit under Manage Employees > Employee Center in the HR Admin module. Navigate to their Rate tab. You will see any rates the employee has had assigned to them. To assign a new rate, select the blue copy button next to the most recent rate.
This will bring up the Rate Edit screen. Below is an explanation of the various fields on the rate edit screen:

- Code - the rate code. A primary rate of pay is classified as a Base Rate. An employee may have additional rates, which would be classified separately than the base rate.
- Start Date – the first check date the rate will be active for.
- End Date – the last check date the rate will be active for.
- Reason for Raise – if you have added reason codes in the Company Module, you can pull in those codes here to signify why a raise was entered.
- Pay Frequency – the frequency in which the employee will be paid as well as tax frequency for the employee’s earnings.
- Auto Pay – this will determine if the employee will be paid automatically. Salaried employees are typically set as Pay Base Salary Each Paycheck whereas hourly employees are set as No Standard Automatic Pay, since they will be paid based on any hours entered in the payroll.
- Rate – this would be an hourly rate. Anything entered in here will multiply against the hours entered in payroll to pay out the employee.
- Rate Per – this is a dropdown menu that will show different classifications you can use for the rate instead of just ‘per hour’. Optional and does not affect the employee’s pay, purely for reporting purposes.
- Default – the default amount of hours the employee works each payroll. Typically used for salary employees so you can memo their hours each payroll.
- Salary – a flat amount to be paid out each payroll. If Pay Base Salary Each Paycheck is pulled in under the Auto Pay then the employee will receive the amount indicated here.
- Pay Grade – if you have added Pay Grade codes in the Company Module¸ you can pull in those codes here to signify the pay grade for the rate (will update the minimum, midpoint, maximum, % of midpoint, and % of maximum below).
- Job Code – if you are utilizing job codes, you can pull in a code here so that the employee’s pay will be attributed to a specific job code
- Department – this would be the employee’s Cost Center 1 (CC1). If left blank, then the employee’s base pay will be attributed to the home department they are assigned to. Typically does not get filled in unless you are linking rates to cost center levels.
- Location – if being utilized, this would be the employee’s Cost Center 2 (CC2). If left blank, then the employee’s base pay will be attributed to the home location they are assigned to. Typically does not get field in unless you are linking rates to cost center levels.
- Shift – if you are utilizing shift codes, then you can assign this rate to a specific shift code that can alter an employee’s pay or just be tracked for reporting purposes.
The reason for copying instead of using the New Base Rate button is in relation to Department, Location, Default and Auto Pay. The copy feature will bring all these fields forward onto the new rate:

When inputting the new salary amount, you will see that the Start Date defaults to your next check date. The next check date will always be pulled in, which can be changed. Once finished, you can select the Save button on the bottom. You will then be brought to the employee’s rate tab.
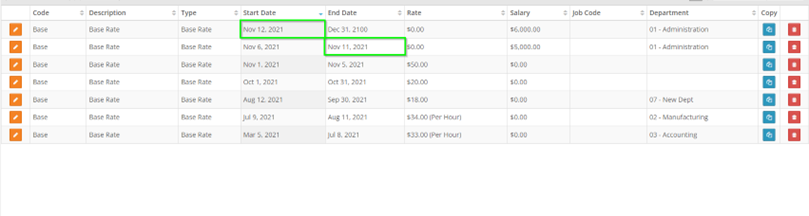
There will be a new line here for the rate you just added. The previous rate will be end dated effective the day prior to the start date of the new rate automatically.
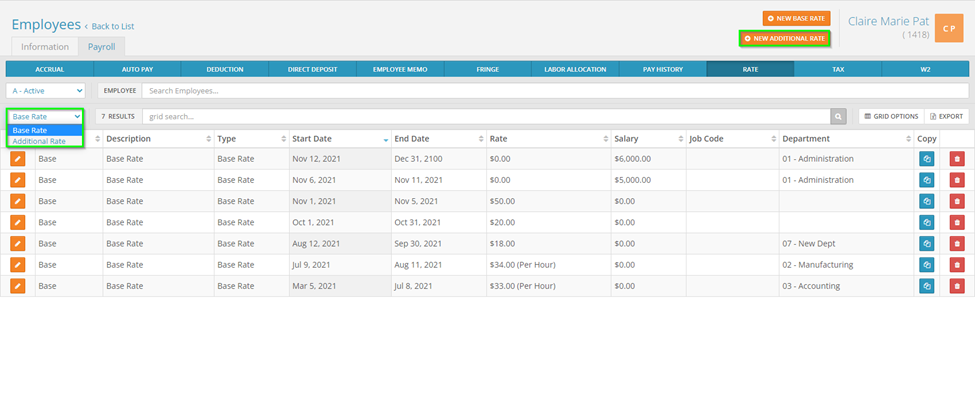
The same process would apply for additional rates. You can switch between Base Rates and Additional Rates by selecting the dropdown menu above the Code column to the left. You can also add additional rates by selecting the New Additional Rate button in the top right.